
Express アプリで使用するミドルウェアを書く
Middleware 関数は、request object (req) にアクセスできる関数です。 response object (res)とアプリケーションのリクエストレスポンスサイクルの中の next 関数。 next 関数はExpressルータ内の関数で、呼び出されたときに現在のミドルウェアを継承してミドルウェアを実行します。 next 関数はExpressルータ内の関数で、呼び出されたときに現在のミドルウェアを継承してミドルウェアを実行します。
ミドルウェア機能は以下のタスクを実行できます。
- 任意のコードを実行します。
- リクエストとレスポンスオブジェクトに変更を加えます。
- リクエストレスポンスサイクルを終了します。
- スタック内の次のミドルウェアを呼び出します。
現在のミドルウェア関数がリクエスト応答サイクルを終了しない場合は、次のミドルウェア関数に制御を渡すために next() を呼び出す必要があります。 そうでなければ、リクエストはハングアップのままになります。そうでなければ、リクエストはハングアップのままになります。
次の図はミドルウェア関数呼び出しの要素を示しています。
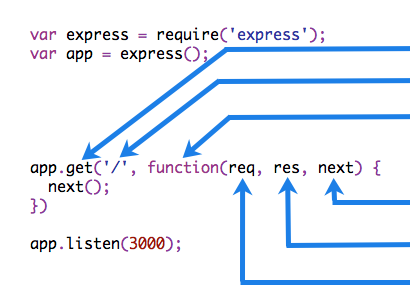
Express 5以降、Promiseを返すミドルウェア関数はエラーの拒否またはスロー時に「next(value)」を呼び出します。 nextは、拒否された値またはスローされたエラーで呼び出されます。 nextは、拒否された値またはスローされたエラーで呼び出されます。
例
以下は、簡単な「Hello World」エクスプレスアプリケーションの例です。以下は、簡単な「Hello World」エクスプレスアプリケーションの例です。
The remainder of this article will define and add three middleware functions to the application:
one called myLogger that prints a simple log message, one called requestTime that
displays the timestamp of the HTTP request, and one called validateCookies that validates incoming cookies.
const express = require('express');const app = express();
app.get('/', (req, res) => {  res.send('Hello World!');});
app.listen(3000);import express from 'express';
const app = express();
app.get('/', (req, res) => { res.send('Hello World!');});
app.listen(3000);import express, { type Express, type Request, type Response } from 'express';
const app: Express = express();
app.get('/', (req: Request, res: Response) => { res.send('Hello World!');});
app.listen(3000);ミドルウェア関数 myLogger
Here is a simple example of a middleware function called “myLogger”. This function just prints
“LOGGED” when a request to the app passes through it. 以下は、「myLogger」というミドルウェア関数の簡単な例です。 この関数は、アプリへのリクエストがそれを通過したときに
“LOGGED” を出力します。 ミドルウェア関数は、myLoggerという名前の
変数に割り当てられます。
const myLogger = function (req, res, next) { console.log('LOGGED'); next();};import { type Request, type Response, type NextFunction } from 'express';
const myLogger = function (req: Request, res: Response, next: NextFunction) { console.log('LOGGED'); next();};Here myLogger is defined on its own rather than passed directly to app.use(), so TypeScript has
no context to infer its parameters and they are annotated explicitly. You can instead type the whole
function as RequestHandler, which types req, res, and next for you. When the middleware is
written inline in the app.use() call, Express infers those three parameters and no annotations are
needed.
Notice the call above to next(). Calling this function invokes the next middleware function in
the app. The next() function is not a part of the Node.js or Express API, but is the third
argument that is passed to the middleware function. The next() function could be named anything,
but by convention it is always named “next”. To avoid confusion, always use this convention.
ミドルウェア関数をロードするには、ミドルウェア関数を指定して app.use() を呼び出します。
例えば、次のコードはルートパス(/)の前にmyLoggerミドルウェア関数をロードします。
For example, the following code loads the myLogger middleware function before the route to the root path (/).
const express = require('express');const app = express();
const myLogger = function (req, res, next) {  console.log('LOGGED');  next();};
app.use(myLogger);
app.get('/', (req, res) => {  res.send('Hello World!');});
app.listen(3000);import express from 'express';
const app = express();
const myLogger = function (req, res, next) { console.log('LOGGED'); next();};
app.use(myLogger);
app.get('/', (req, res) => { res.send('Hello World!');});
app.listen(3000);import express, { type Express, type Request, type Response, type NextFunction } from 'express';
const app: Express = express();
const myLogger = function (req: Request, res: Response, next: NextFunction) { console.log('LOGGED'); next();};
app.use(myLogger);
app.get('/', (req: Request, res: Response) => { res.send('Hello World!');});
app.listen(3000);アプリがリクエストを受け取るたびに、「LOGGED」というメッセージが端末に出力されます。
ミドルウェアのロード順序は重要です。最初にロードされるミドルウェア関数も最初に実行されます。
ルートパスの後にmyLoggerがロードされている場合、リクエストは到達せず、アプリは”LOGGED”を出力しません。 なぜなら、ルートパスのルートハンドラは、リクエスト応答サイクルを終了するからです。
ミドルウェア関数 myLogger は単にメッセージを出力します。 次に、next()関数を呼び出すことで、スタック内の次のミドルウェア関数にリクエストを渡します。
ミドルウェア関数requestTime
Next, we’ll create a middleware function called “requestTime” and add a property called requestTime
to the request object.
Because the middleware adds a property to req, extend the request type in TypeScript with
declaration merging. Declare
the property (as optional, since a middleware may not run for every request) in a .d.ts file that
is part of your project:
declare global {  namespace Express {    interface Request {      requestTime?: number;    }  }}
export {};
TypeScript picks up the file automatically, so no tsconfig.json change is needed unless you have
set a custom include that does not cover its location. See
Extending the API in TypeScript for
adding other custom properties and methods.
const requestTime = function (req, res, next) { req.requestTime = Date.now(); next();};import { type Request, type Response, type NextFunction } from 'express';
const requestTime = function (req: Request, res: Response, next: NextFunction) { req.requestTime = Date.now(); next();};The app now uses the requestTime middleware function. アプリは requestTime ミドルウェア関数を使用します。 また、ルートのコールバック関数はミドルウェア関数がreq(リクエストオブジェクト)に追加するプロパティを使用します。
const express = require('express');const app = express();
const requestTime = function (req, res, next) {  req.requestTime = Date.now();  next();};
app.use(requestTime);
app.get('/', (req, res) => {  let responseText = 'Hello World!<br>';  responseText += `<small>Requested at: ${req.requestTime}</small>`;  res.send(responseText);});
app.listen(3000);import express from 'express';
const app = express();
const requestTime = function (req, res, next) { req.requestTime = Date.now(); next();};
app.use(requestTime);
app.get('/', (req, res) => { let responseText = 'Hello World!<br>'; responseText += `<small>Requested at: ${req.requestTime}</small>`; res.send(responseText);});
app.listen(3000);import express, { type Express, type Request, type Response, type NextFunction } from 'express';
const app: Express = express();
const requestTime = function (req: Request, res: Response, next: NextFunction) { req.requestTime = Date.now(); next();};
app.use(requestTime);
app.get('/', (req: Request, res: Response) => { let responseText = 'Hello World!<br>'; responseText += `<small>Requested at: ${req.requestTime}</small>`; res.send(responseText);});
app.listen(3000);アプリのルートにリクエストを送信すると、アプリはブラウザにリクエストのタイムスタンプを表示するようになりました。
ミドルウェア関数 validateCookies
最後に、入力されたクッキーを検証するミドルウェア機能を作成し、クッキーが無効な場合に400回のレスポンスを送信します。
ここでは、外部非同期サービスで Cookie を検証する機能の例を示します。
async function cookieValidator(cookies) { try { await externallyValidateCookie(cookies.testCookie); } catch { throw new Error('Invalid cookies'); }}async function cookieValidator(cookies: Record<string, string>) { try { await externallyValidateCookie(cookies.testCookie); } catch { throw new Error('Invalid cookies'); }}ここでは、cookie-parser ミドルウェアを使用して、reqオブジェクトから入ってくるCookieを解析し、それを私たちのcookieValidator関数に渡します。 validateCookiesミドルウェアは、拒否時に自動的にエラーハンドラをトリガーするPromiseを返します。 The validateCookies middleware returns a Promise that upon rejection will automatically trigger our error handler.
const express = require('express');const cookieParser = require('cookie-parser');const cookieValidator = require('./cookieValidator');
const app = express();
async function validateCookies(req, res, next) {  await cookieValidator(req.cookies);  next();}
app.use(cookieParser());
app.use(validateCookies);
// error handlerapp.use((err, req, res, next) => {  res.status(400).send(err.message);});
app.listen(3000);import express from 'express';import cookieParser from 'cookie-parser';import cookieValidator from './cookieValidator';
const app = express();
async function validateCookies(req, res, next) { await cookieValidator(req.cookies); next();}
app.use(cookieParser());
app.use(validateCookies);
// error handlerapp.use((err, req, res, next) => { res.status(400).send(err.message);});
app.listen(3000);import express, { type Express, type Request, type Response, type NextFunction } from 'express';import cookieParser from 'cookie-parser';import cookieValidator from './cookieValidator';
const app: Express = express();
async function validateCookies(req: Request, res: Response, next: NextFunction) { await cookieValidator(req.cookies); next();}
app.use(cookieParser());
app.use(validateCookies);
// error handlerapp.use((err: Error, req: Request, res: Response, next: NextFunction) => { res.status(400).send(err.message);});
app.listen(3000);await cookieValidator(req.cookies)の後にnext()が呼び出されることに注意してください。 これにより、
cookieValidator が解決した場合、スタック内の次のミドルウェアが呼ばれます。 If you pass anything
to the next() function (except the string 'route' or 'router'), Express regards the current
request as being an error and will skip any remaining non-error handling routing and middleware
functions. This ensures that if
cookieValidator resolves, the next middleware in the stack will get called. If you pass anything
to the next() function (except the string 'route' or 'router'), Express regards the current
request as being an error and will skip any remaining non-error handling routing and middleware
functions.
Because you have access to the request object, the response object, the next middleware function in the stack, and the whole Node.js API, the possibilities with middleware functions are endless.
設定可能なミドルウェア
ミドルウェアの設定が必要な場合は、optionsオブジェクトや他のパラメータを受け付ける関数をエクスポートしてください。 入力パラメータに基づいてミドルウェアの実装を返します。
module.exports = function (options) { return function (req, res, next) { // Implement the middleware function based on the options object next(); };};export default function (options) { return function (req, res, next) { // Implement the middleware function based on the options object next(); };}import { type Request, type Response, type NextFunction } from 'express';
export default function (options: Record<string, unknown>) { return function (req: Request, res: Response, next: NextFunction) { // Implement the middleware function based on the options object next(); };}ミドルウェアを以下のように使用できるようになりました。
const mw = require('./my-middleware.cjs');
app.use(mw({ option1: '1', option2: '2' }));import mw from './my-middleware.mjs';
app.use(mw({ option1: '1', option2: '2' }));構成可能なミドルウェアの例については、 cookie-session と compression を参照してください。