Production best practices: performance and reliability
import CodeTabs from '@components/primitives/Tabs/CodeTabs.astro';This article discusses performance and reliability best practices for Express applications deployed to production.
This topic clearly falls into the “devops” world, spanning both traditional development and operations. Accordingly, the information is divided into two parts:
- Things to do in your code (the dev part):
- Things to do in your environment / setup (the ops part):
Things to do in your code
Here are some things you can do in your code to improve your application’s performance:
- Use gzip compression
- Don’t use synchronous functions
- Do logging correctly
- Handle exceptions properly
Use gzip compression
Gzip compressing can greatly decrease the size of the response body and hence increase the speed of a web app. Use the compression middleware for gzip compression in your Express app. For example:
const compression = require('compression');const express = require('express');const app = express();
app.use(compression());import compression from 'compression';import express from 'express';
const app = express();
app.use(compression());For a high-traffic website in production, the best way to put compression in place is to implement it at a reverse proxy level (see Use a reverse proxy). In that case, you do not need to use compression middleware. For details on enabling gzip compression in Nginx, see Module ngx_http_gzip_module in the Nginx documentation.
Don’t use synchronous functions
Synchronous functions and methods tie up the executing process until they return. A single call to a synchronous function might return in a few microseconds or milliseconds, however in high-traffic websites, these calls add up and reduce the performance of the app. Avoid their use in production.
Although Node and many modules provide synchronous and asynchronous versions of their functions, always use the asynchronous version in production. The only time when a synchronous function can be justified is upon initial startup.
You can use the --trace-sync-io command-line flag to print a warning and a stack trace whenever your application uses a synchronous API. Of course, you wouldn’t want to use this in production, but rather to ensure that your code is ready for production. See the node command-line options documentation for more information.
Do logging correctly
In general, there are two reasons for logging from your app: For debugging and for logging app activity (essentially, everything else). Using console.log() or console.error() to print log messages to the terminal is common practice in development. But these functions are synchronous when the destination is a terminal or a file, so they are not suitable for production, unless you pipe the output to another program.
For debugging
If you’re logging for purposes of debugging, then instead of using console.log(), use a special debugging module like debug. This module enables you to use the DEBUG environment variable to control what debug messages are sent to console.error(), if any. To keep your app purely asynchronous, you’d still want to pipe console.error() to another program. But then, you’re not really going to debug in production, are you?
For app activity
If you’re logging app activity (for example, tracking traffic or API calls), instead of using console.log(), use a logging library like Pino, which is the fastest and most efficient option available.
Handle exceptions properly
Node apps crash when they encounter an uncaught exception. Not handling exceptions and taking appropriate actions will make your Express app crash and go offline. If you follow the advice in Ensure your app automatically restarts below, then your app will recover from a crash. Fortunately, Express apps typically have a short startup time. Nevertheless, you want to avoid crashing in the first place, and to do that, you need to handle exceptions properly.
To ensure you handle all exceptions, use the following techniques:
Before diving into these topics, you should have a basic understanding of Node/Express error handling: using error-first callbacks, and propagating errors in middleware. Node uses an “error-first callback” convention for returning errors from asynchronous functions, where the first parameter to the callback function is the error object, followed by result data in succeeding parameters. To indicate no error, pass null as the first parameter. The callback function must correspondingly follow the error-first callback convention to meaningfully handle the error. And in Express, the best practice is to use the next() function to propagate errors through the middleware chain.
For more on the fundamentals of error handling, see:
Use try-catch
Try-catch is a JavaScript language construct that you can use to catch exceptions in synchronous code. Use try-catch, for example, to handle JSON parsing errors as shown below.
Here is an example of using try-catch to handle a potential process-crashing exception. This middleware function accepts a query field parameter named “params” that is a JSON object.
app.get('/search', (req, res) => { // Simulating async operation setImmediate(() => { const jsonStr = req.query.params; try { const jsonObj = JSON.parse(jsonStr); res.send('Success'); } catch (e) { res.status(400).send('Invalid JSON string'); } });});However, try-catch works only for synchronous code. Because the Node platform is primarily asynchronous (particularly in a production environment), try-catch won’t catch a lot of exceptions.
Use promises
When an error is thrown in an async function or a rejected promise is awaited inside an async function, those errors will be passed to the error handler as if calling next(err)
app.get('/', async (req, res, next) => {  const data = await userData(); // If this promise fails, it will automatically call `next(err)` to handle the error.
  res.send(data);});
app.use((err, req, res, next) => {  res.status(err.status ?? 500).send({ error: err.message });});
Also, you can use asynchronous functions for your middleware, and the router will handle errors if the promise fails, for example:
app.use(async (req, res, next) => {  req.locals.user = await getUser(req);
  next(); // This will be called if the promise does not throw an error.});
Best practice is to handle errors as close to the site as possible. So while this is now handled in the router, it’s best to catch the error in the middleware and handle it without relying on separate error-handling middleware.
What not to do
One thing you should not do is to listen for the uncaughtException event, emitted when an exception bubbles all the way back to the event loop. Adding an event listener for uncaughtException will change the default behavior of the process that is encountering an exception; the process will continue to run despite the exception. This might sound like a good way of preventing your app from crashing, but continuing to run the app after an uncaught exception is a dangerous practice and is not recommended, because the state of the process becomes unreliable and unpredictable.
Additionally, using uncaughtException is officially recognized as crude. So listening for uncaughtException is just a bad idea. This is why we recommend things like multiple processes and supervisors: crashing and restarting is often the most reliable way to recover from an error.
We also don’t recommend using domains. It generally doesn’t solve the problem and is a deprecated module.
Things to do in your environment / setup
Here are some things you can do in your system environment to improve your app’s performance:
- Set NODE_ENV to “production”
- Ensure your app automatically restarts
- Run your app in a cluster
- Cache request results
- Use a load balancer
- Use a reverse proxy
Set NODE_ENV to “production”
The NODE_ENV environment variable specifies the environment in which an application is running (usually, development or production). One of the simplest things you can do to improve performance is to set NODE_ENV to production.
Setting NODE_ENV to “production” makes Express:
- Cache view templates.
- Cache CSS files generated from CSS extensions.
- Generate less verbose error messages.
Tests indicate that just doing this can improve app performance by a factor of three!
If you need to write environment-specific code, you can check the value of NODE_ENV with process.env.NODE_ENV. Be aware that checking the value of any environment variable incurs a performance penalty, and so should be done sparingly.
In development, you typically set environment variables in your interactive shell, for example by using export or your .bash_profile file. But in general, you shouldn’t do that on a production server; instead, use your OS’s init system (systemd). The next section provides more details about using your init system in general, but setting NODE_ENV is so important for performance (and easy to do), that it’s highlighted here.
With systemd, use the Environment directive in your unit file. For example:
Environment=NODE_ENV=productionFor more information, see Using Environment Variables In systemd Units.
Ensure your app automatically restarts
In production, you don’t want your application to be offline, ever. This means you need to make sure it restarts both if the app crashes and if the server itself crashes. Although you hope that neither of those events occurs, realistically you must account for both eventualities by:
- Using a process manager to restart the app (and Node) when it crashes.
- Using the init system provided by your OS to restart the process manager when the OS crashes. It’s also possible to use the init system without a process manager.
Node applications crash if they encounter an uncaught exception. The foremost thing you need to do is to ensure your app is well-tested and handles all exceptions (see handle exceptions properly for details). But as a fail-safe, put a mechanism in place to ensure that if and when your app crashes, it will automatically restart.
Use a process manager
In development, you started your app simply from the command line with node server.js or something similar. But doing this in production is a recipe for disaster. If the app crashes, it will be offline until you restart it. To ensure your app restarts if it crashes, use a process manager. A process manager is a “container” for applications that facilitates deployment, provides high availability, and enables you to manage the application at runtime.
In addition to restarting your app when it crashes, a process manager can enable you to:
- Gain insights into runtime performance and resource consumption.
- Modify settings dynamically to improve performance.
- Control clustering (pm2).
Historically, it was popular to use a Node.js process manager like PM2. See their documentation if you wish to do this. However, we recommend using your init system for process management.
Use an init system
The next layer of reliability is to ensure that your app restarts when the server restarts. Systems can still go down for a variety of reasons. To ensure that your app restarts if the server crashes, use the init system built into your OS. The main init system in use today is systemd.
There are two ways to use init systems with your Express app:
- Run your app in a process manager, and install the process manager as a service with the init system. The process manager will restart your app when the app crashes, and the init system will restart the process manager when the OS restarts. This is the recommended approach.
- Run your app (and Node) directly with the init system. This is somewhat simpler, but you don’t get the additional advantages of using a process manager.
Systemd
Systemd is a Linux system and service manager. Most major Linux distributions have adopted systemd as their default init system.
A systemd service configuration file is called a unit file, with a filename ending in .service. Here’s an example unit file to manage a Node app directly. Replace the values enclosed in <angle brackets> for your system and app:
[Unit]Description=<Awesome Express App>
[Service]Type=simpleExecStart=/usr/local/bin/node </projects/myapp/index.js>WorkingDirectory=</projects/myapp>
User=nobodyGroup=nogroup

Environment=NODE_ENV=production

LimitNOFILE=infinity

LimitCORE=infinity
StandardInput=nullStandardOutput=syslogStandardError=syslogRestart=always
[Install]WantedBy=multi-user.target
For more information on systemd, see the systemd reference (man page).
Run your app in a cluster
In a multi-core system, you can increase the performance of a Node app by many times by launching a cluster of processes. A cluster runs multiple instances of the app, ideally one instance on each CPU core, thereby distributing the load and tasks among the instances.
IMPORTANT: Since the app instances run as separate processes, they do not share the same memory space. That is, objects are local to each instance of the app. Therefore, you cannot maintain state in the application code. However, you can use an in-memory datastore like Redis to store session-related data and state. This caveat applies to essentially all forms of horizontal scaling, whether clustering with multiple processes or multiple physical servers.
In clustered apps, worker processes can crash individually without affecting the rest of the processes. Apart from performance advantages, failure isolation is another reason to run a cluster of app processes. Whenever a worker process crashes, always make sure to log the event and spawn a new process using cluster.fork().
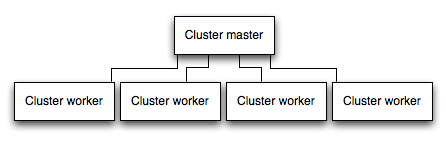
Using Node’s cluster module
Clustering is made possible with Node’s cluster module. This enables a master process to spawn worker processes and distribute incoming connections among the workers.
Using PM2
If you deploy your application with PM2, then you can take advantage of clustering without modifying your application code. You should ensure your application is stateless first, meaning no local data is stored in the process (such as sessions, websocket connections and the like).
When running an application with PM2, you can enable cluster mode to run it in a cluster with a number of instances of your choosing, such as the matching the number of available CPUs on the machine. You can manually change the number of processes in the cluster using the pm2 command line tool without stopping the app.
To enable cluster mode, start your application like so:
$ pm2 start npm --name my-app -i 4 -- start
$ pm2 start npm --name my-app -i max -- start
This can also be configured within a PM2 process file (ecosystem.config.js or similar) by setting exec_mode to cluster and instances to the number of workers to start.
Once running, the application can be scaled like so:
$ pm2 scale my-app +3
$ pm2 scale my-app 2
For more information on clustering with PM2, see Cluster Mode in the PM2 documentation.
Cache request results
Another strategy to improve the performance in production is to cache the result of requests, so that your app does not repeat the operation to serve the same request repeatedly.
Use a caching server like Varnish or Nginx (see also Nginx Caching) to greatly improve the speed and performance of your app.
Use a load balancer
No matter how optimized an app is, a single instance can handle only a limited amount of load and traffic. One way to scale an app is to run multiple instances of it and distribute the traffic via a load balancer. Setting up a load balancer can improve your app’s performance and speed, and enable it to scale more than is possible with a single instance.
A load balancer is usually a reverse proxy that orchestrates traffic to and from multiple application instances and servers. You can easily set up a load balancer for your app by using Nginx or HAProxy.
With load balancing, you might have to ensure that requests that are associated with a particular session ID connect to the process that originated them. This is known as session affinity, or sticky sessions, and may be addressed by the suggestion above to use a data store such as Redis for session data (depending on your application). For a discussion, see Using multiple nodes.
Use a reverse proxy
A reverse proxy sits in front of a web app and performs supporting operations on the requests, apart from directing requests to the app. It can handle error pages, compression, caching, serving files, and load balancing among other things.
Handing over tasks that do not require knowledge of application state to a reverse proxy frees up Express to perform specialized application tasks. For this reason, it is recommended to run Express behind a reverse proxy like Nginx or HAProxy in production.